Switchfoil® installation and treatment
- Carefully remove the foil from the packaging (without kinking the foil)
- The foil of 0.6 mm thick, which rather feels like a thin plate, is, with some care, to apply by everyone because of the mild repositionable gluing.
- First, the glass and the direct surrounding parts such as the glazing beads and the window frames must be thoroughly cleaned.
- This must be done with pure alcohol (96%). Do not use other (secundary) alcohols like for example isopropyl alcohol. That can disrupt the build-up (structure) of the special glue.
- The glass must be completely degreased and 100% dry (also not condensed, what is possible when the glass is too cold)! Even at the edges and corners!
- When this has been done, the foil can be installed. Never use the so called "wet methode"! It's not the glue for that! The adhesive force of the glue is a little bit comparable with that of a memo-paper.
- If the film is in the beginning not at the right position immediately, you can take it off and do it again. When removing, make sure that the layers are not separated and the film does not bend!
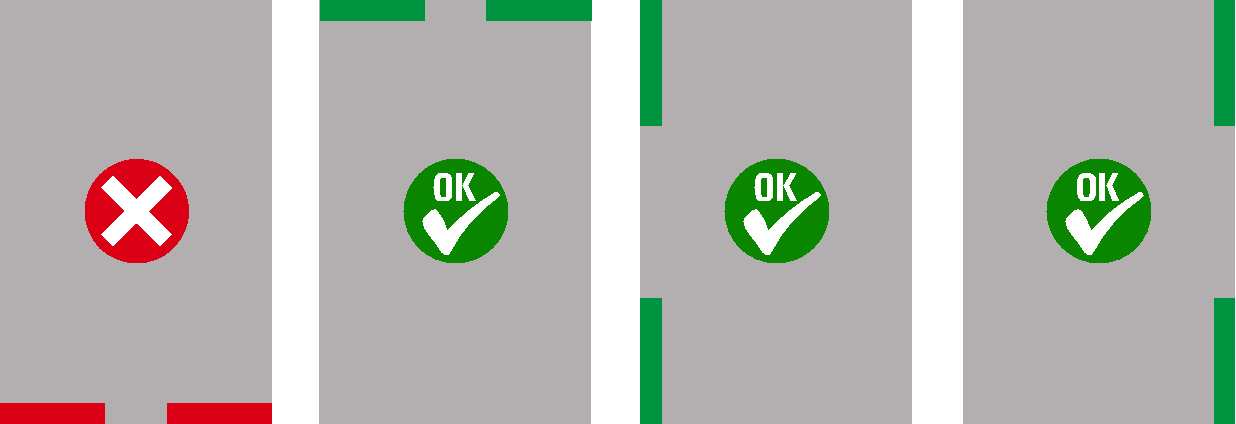
- The foil must be installed with the electrodes at the top or side of the window.
- Leave most of the protective foil intact, but at the back of the foil, the side with the adhesive, it can be pulled down and folded away for about 20 - 30 cm.
- Position the foil, with the remaining of the protective foil attached, against the glass at the right aligned position and attach the lower half using the masking tape, making sure that the foil will not be shifting.
- The top part, where the protective foil has already been folded down, can now be attached to the glass using the provided squeegee and applying a little pressure while making horizontal strokes.
- When this top part has been done, the masking tape at the bottom can be removed and the protective layer at the back can be slowly pulled downwards while you make horizontal strokes using the squeegee, attaching the foil to the glass.
- Continue doing this until the entire piece of Switchfoil is attached.
- When this has been done, close the edges with an solvent- and acidfree (silicon)sealant. This is not necessary with aluminium or plastic frames as the edges of the foil will fall behind the click-on profiles / glazing beads.
- It is essential to use an acid-free sealant as it may otherwise affect the crystals! This and other products can be found in our webshop.
- After applying the sealant, you can remove the protective foil at the front of the Switchfoil and conceal the wires in the manner you prefer.
- If parts need to be worked because the size of the window, the parts must be mounted with a distance of approx. 1 mm between them and a transparent self-adhesive film (sealing tape), overlapping 10 mm on both parts, to protect the ends of the film during maintenance.
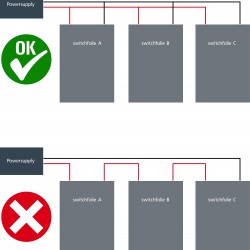
- Avoid at all times that connections of 2 panels touch each other after mounting. This will cause short circuits. If in doubt, ask a certified installer.
- In our webshop you can order various accessories, such as the aluminum finishing strip to get rid of the connection points and braided polyester stocking, where the wiring is visible, to give it a neater look.
Connections
Shapes and sizes
- We use a laser to cut the foil to exact the desired size or shape.
- We advise you not to cut the foil yourself, but if this is absolutely necessary, you should use a pair of sharp scissors at all times (no knife).
- The layers in the foil may not be "pulled apart" or "separated" from each other.
- With every delivery, you will receive a test piece of foil; use this piece to test out things first!
- The warranty on the foil will be void when you cut the foil to the right size yourself.
Maintenance
- Switch off the power (etched glass) before cleaning the window or panel.
- Clean the window or panel only with a 96% alcohol moist cloth, do not use other liquids and soaked cloth or sponge.
- Certainly if it has been decided not to seal the foil all around, cleaning may only be done with a cloth with 96% alcohol. The edges of the foil must never come into contact with other (chemical) liquids, because these can mix with the Liquid Crystals in the intermediate layer and can affect the working of the foil!
- Do not use aggressive industrial or ammonia-containing detergents or tools that can scratch the surface.
- The Switchfoil is scratch-resistant but not scratch-proof!
- When the foil is clean and dry (Please note: including the edges), the power can be switched on again.


